Friday, May 23, 2008
POWER PLANT FORUM is now LIVE!
POWER PLANT FORUM
Powerplantforum.com Is now LIVE! and ready to serve the power industry. We launched the website officially on Tuesday 5/20/2008. The site is still a work in progress but felt that we needed to provide this service to benefit the power community as quickly as possible. Powerplantforum.com's success is contingent from the support of users and contributers. Without the ongoing dialogues (Q&A), this site will not benefit anyone. Please sign up to POWERPLANTFORUM.com and start contributing!
LEARN. EDUCATE. NETWORK
Saturday, May 17, 2008
1st Stage Nozzle Ring
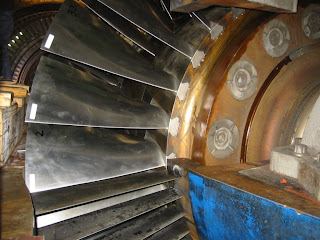
Here's a shot of the first stage nozzle ring installation. Once the compressor and CDC casing was landed, it allocated work for the front and aft end of the unit. As you can see, the manifolds are being worked in parallel with the turbine section.
Lessons learned: when installating new first stage nozzle there is the chance that the previous blocks are not of the right size to set it concentrically. We ended up machining .050" shims using the water jet cutter at our shop. Most utilities are not as fortunate to have such equipment at their fingertips. In that case, purchase larger horizontal nozzle blocks which can be easily machined down to the proper size.
Aftermarket upgrades to aft end compressor
During this outage we upgraded our stage 17 stator and exit guide vanes. The OEM's stator 17 vanes and exit guide vanes is the single airfoil design which are susceptible to vibratory failures. During operating in conditions such as low ambient and part load, flow separation can occur at the S17 bladed due to the inner barrel counter bore cavity and "vortex bursts." This occurs at the S17 tip and causes airfoil distress. The current software modification provided by the OEM redefined the safe operating window that the unit can operate without incurring damage to the unit's S17 and EGV hardware. We've decided to upgrade to a shrouded S17design and shrouded exit guide vanes. The benefits are a more robust S17 and EGV setup which reduces the risks of compressor damage and possibly forced outages. In addition, the modification would eliminate all S17 software protection which defines the limits the safe operating window of the unit. The modification which we chose, shrouded 5 vanes into segments on the 17th stage and exit guide vanes. The modification also retained the existing inner barrel/bore plugs which only required machining a groove to fit the shroud tips. See photos of this modification.
Thursday, May 1, 2008
Non-destructive cleaning alternative
The co2 blasting cleaning process is relatively new dating back to the late 1980's. It is quickly becoming favored to such traditional cleaning methods as steam cleaning, sandblasting or solvents. It can be used in a vast assortment of applications especially getting your turbine disk clean for FPI and eddy current inspections. Dry ice pellets are pushed through an air gun and once making contact with the cleaning surface it dissolves and releases C02 gas. Since the pellets are much softer than the base metal surface, there is no risk of equipment damage.
Co2 blasting benefits can be broken down into six general areas. They are as follows:
#1 - Decreased Downtime
#2 - Faster and More Thorough Cleaning
#3 - Elimination of Equipment Damage
#4 - Reduction or Elimination of Solvents
#5 - Reductions in Waste Disposal
#6 - Increased Safety
Friday, April 25, 2008
Smoke Stacks....with near ZERO emissions!
When people look at this image they think of air polluting "Smoke Stacks"... True, while stacks are used to divert pollutants and harmful emissions high above the atmosphere, stacks today are fairly clean with near zero emissions. With low nox combustion turbines, emissions are reduced to below 9ppm of Nox and Co. Certain power plants also have catalysts installed which will further reduce emissions to near Zero. The stacks seen here have near zero missions aided by Dry Low Nox combustion turbines and CO and Nox catalysts. During days when white smoke can be seen billowing out of the stacks, it is actually water vapors created once the residual turbine exhaust of 250+ deg F is introduced to cold ambient temperatures. It might look as though the white smoke is polluting the enviorment but I can assure you it is really extremely low in emissions.
Wednesday, April 23, 2008
Outage consumables set up
Getting all of your consumables organized is key.... I've developed spreadsheets with hardware requirements for each outage CI, HGPI, and MI and purchased three fully stocked kits. As the parts are exhausted after each outage, the kits are replenished on a spot buy and stored for later use. The compartments and drawers are labeled with part numer identification and reflected on the spreadsheet to ease tracking.
Check it out!
Tuesday, April 22, 2008
End of the first outage....Start of the second ! HALF WAY THERE
I apologize for not updating my blog after the 23rd day of the outage but things were getting hectic with startup. We lit off on gas successfully and also on liquid fuel.. FIRE the FIRST TRY.
We've started tearing into the second unit this week and I'll update my blog with key events rather than daily reports. Week 6... Three more to go..hopefully!
Here is a photo of a fully assembled turbine with all of the piping intact. You can definately get a feel of how labor intensive working on a dual fuel machine is.
Lessons learned, spend time to match mark and label everything before tearing into the unit. It will save time in the long run and installation process!
Tuesday, April 8, 2008
Day 23...Combustion Hardware Restoration!
its day 23... we are facing with the challenge of identifying where all of the small flex hoses go. nuts and bolts are EVERYWHERE! looks like a turbine blew up from under the compartment. We did our best to sort out just enough material to rebuild each combustion can but still to no avail since the mechanics has a habit of digging into another bag of hardware from another can. Majority of the aft end piping is completed. Turbine roof had been mounted and the electricians are in the process of terminating all of the connections. We will start loop checking with I&C the devices around the unit.. this will be very grueling! Permits DUE tomorrow Evening... date for Startup will be this Sunday. *fingers crossed*
Monday, April 7, 2008
Day 20....Manifolds and restoration
Friday, April 4, 2008
Day 19... 6 days left!
Wednesday, April 2, 2008
Day 18....THE SHELLS ARE ON!
Okay its finally starting to look like a turbine again. We spend yesterday trying to fish out some foreign matter that entered the compressor section. check out the images from the borescope inspection. They look HUGE right? In reality they are merely a few centimeters! We used compressed air to blow out some of the metal shavings and wood cribbing fragments but lost some time on the reassembly. Lessons learned: stage the wooden platform below the horizontal joint and dont FPI (zyglo) the compressor blades until the metal shavings are blown out.
the CDC casing and turbine shells are back on and the crew is working on bolting the bad boy up along with installing some of the lower half TP's.
less than a week left! Fuel piping will be a nightmare!
Monday, March 31, 2008
Day 16....Schedule showing 72 hours behind!
We installed the entire first stage nozzle rings today in addition to the upper half inner barrel. We are in the middle of a close out inspection of the aft end of the compressor casing and compressor to turbine spool piece to support the reassembly of the compressor discharge casing.
The night shift was not successful in dropping the bell mouth since they did not have the proper tools to inset the heli coils. they are a funky 1 1/2" 8 TPN. We spent the day expediting the insertion tools for reassembly tonight.
I hope to have the bell mouth closed and CDC set in place by morning!
*fingers crossed*
Sunday, March 30, 2008
Day 15... Sunday to Relax
The turbine upper half casing is complete...all of the shrouds and nozzles were installed and ready for reassembly. The RO blades were delivered early morning and the bucket techs completed installing shortly after lunch. Lets keep out fingers cross that this replacement set purchased is not a lemon!
PowerPlantForum LOGO....this is it!
PowerPlantForum.com is the side project I've been working on with my college buddy... We had a slow start the past year but hopefully within the next few months, we'll go live with the web site. I truly believe in the website and is much needed for the industry. I don't think it will pay the bills but at least offer a means for everyone in the power industry to network and discuss about issues and best practices.
Saturday, March 29, 2008
Day 14....Tip grinding and Shell installation
Its a saturday... Overtime pay day today! Its ironic that no one wants to work! We only had a crew of 8 ppls from 7am to 3pm... and from 3-7pm it was just the vendors and myself! The vendors set up their compressor tip grinding machine which is like a belt sander to shave a few mills off the tips of R13-R15 blades. This will allow thermal expansion and avoid rubbing the casing. We started putting shrouds and nozzles on the upper half turbine casing.. still needs to complete the installation of the 2nd stage nozzles. Guess they left some items for the night shift to complete!
We'll see how many ppls show for tomorrow!
Friday, March 28, 2008
Day 13 Things are starting to take shape
The turbine shell came back from the OEM today. The weld repair looks decent.. I hope that it will bolt right up. We removed the R0 blades today and inspected all for cracks. Two blades had cracks and another 6-7 showed signs of pitting and fretting wear. New replacements are on their way and should be ready for installation on Sunday morning. The third stage nozzles are installed and the guys are working on installing the second stages. We began mounting shourds to the turbine shell also. things are starting to come together.... hopefully we'll be able to gather all of the hardware removed for a smooth reassembly! Stay tuned!
Thursday, March 27, 2008
Day 12.... Jacking the mouth!
We spent the better portion of the day jacking up the bell mouth 18inches inorder to remove the R0 blade of suspect. The #11 blade will need to be rotated to the horizontal joint in order to be extracted. Once removed, we will perform additional tests to determine the true condition of the R0 blade. Testing includes, ECI, Zyglo PT, UT, and possibly taking dental molds of the dovetails. Cross your fingers!
All three stages of buckets were installed last night in addition to the lower half shroud blocks.
Lower half inner barrel was installed.. and as you can see in the photos a shiny new groove was cut in the aft region for the shrouded S17 and EGV's!
The turbine shell should be on its way back from the GE repair shop tomorrow... but when?
Wednesday, March 26, 2008
Day 11. Reassembly...halfway there.
Chaos Chaos=CASH!!
We discovered fretting wear on one of the rotating blades which will need to be replaced. We are moving feverishly to source replacements!
We started installing the rotating buckets today and will wrap up this evening.
The mechanics will start installing shrouds and 1st nozzle and try to get the inner barrel back on the shaft. The stator vanes on the upper half were reinstalled yesterday along with shrouded S17 and EGv's! check out the cool modification!
Sunday, March 23, 2008
Day 9... Schedule slipping. ouch!
Transformer Deluge System
This shot is not related to the project im working on but thought it would be neat to share with you. The station is performing a monthly compliance test of the fire suppression system.
This water deluge system will automatically activate if the heat detectors pick up around the transformer.
Awesome SHOT!....I feel for the guy getting soaked!
Day 8...Heros on a half-shell...TURBINE POWER!
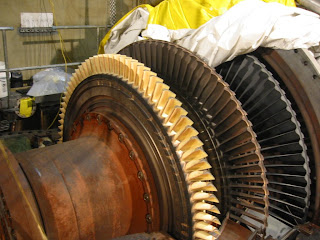
Day 8 was very productive....we finally got the unit on its halfshell with the turbine and compressor section fully exposed. We started removing the upper half blades near the horizontal joints for shim and blade pinning. Mechanics started removing the nozzles and shrouds in order to facilitate removal of the buckets. Second stage nozzles were a pain in the A$$. We fought the second segment for about 6 hours...it finally came out.
See photos of the three rotating section aka. "buckets". The inner barrel was sent to the shops for machining along with the stator blades removed for pinning.
We finally pumped corning into the generator end shields and will set up the 24 hour air test. I hope it passes!
The unit is completly on its half shell..almost ready for cleaning and inspections!
As of now we are right on schedule....without any delays for the additional vendor work.
Friday, March 21, 2008
Day 7....almost apart.
Combustion section:
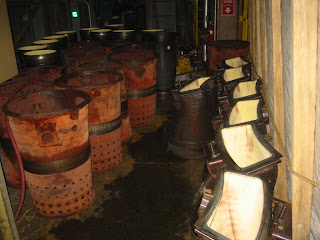
All of the combustion section hardware were removed. The Transistion pieces and flow sleeves in the photos need to be inspected and their condition recorded. No cracked transistion pieces!!
turbine section:
nothing much going on.. the upper half inner barrel was removed today
Compressor section:
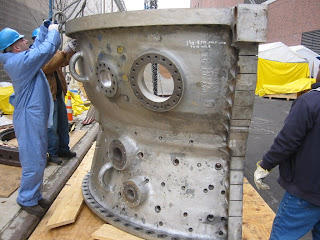
This was the biggest challenge to get the combustion discharge casing off! it took over two shifts to break the bolts and we ended up cutting most of the nuts off.
sweetness. The forward compressor casing also came off today which was really easy to break considering the bolts were not exposed to high temperatures. Blades are exposed!! SCARY! good thing we didnt find anything seriously damaged.
Good job to the crew... they get to take Sunday day shift off for Easter.
We will be Co2 cleaning the unit that day so it'll be all up to the vendor.
Subscribe to:
Posts (Atom)